Quick Start — Handheld Mode
The fastest way to go from box to driving, using just the PIT Transmitter and the app on your phone (no PC required). Each "See Section X" pointer is there for the full detail, but you should be able to do it from the steps below alone.
Wire your receiver — do not power on yet
- CH1 → steering servo signal wire
- CH2 → ESC signal wire (throttle and brake)
- Channel layout: channels are arranged left to right, top to bottom, starting at CH1 (top-left) and ending at CH12 (bottom-right). See the receiver picture below.
- Each channel uses 3 pins in GVS order: Ground — Voltage — Signal.
- G (Ground) = Black or Brown wire
- V (Voltage) = Red wire
- S (Signal) = Orange, White, or Yellow wire
- Do not connect the RC battery yet. See Section 3 for full wiring details.
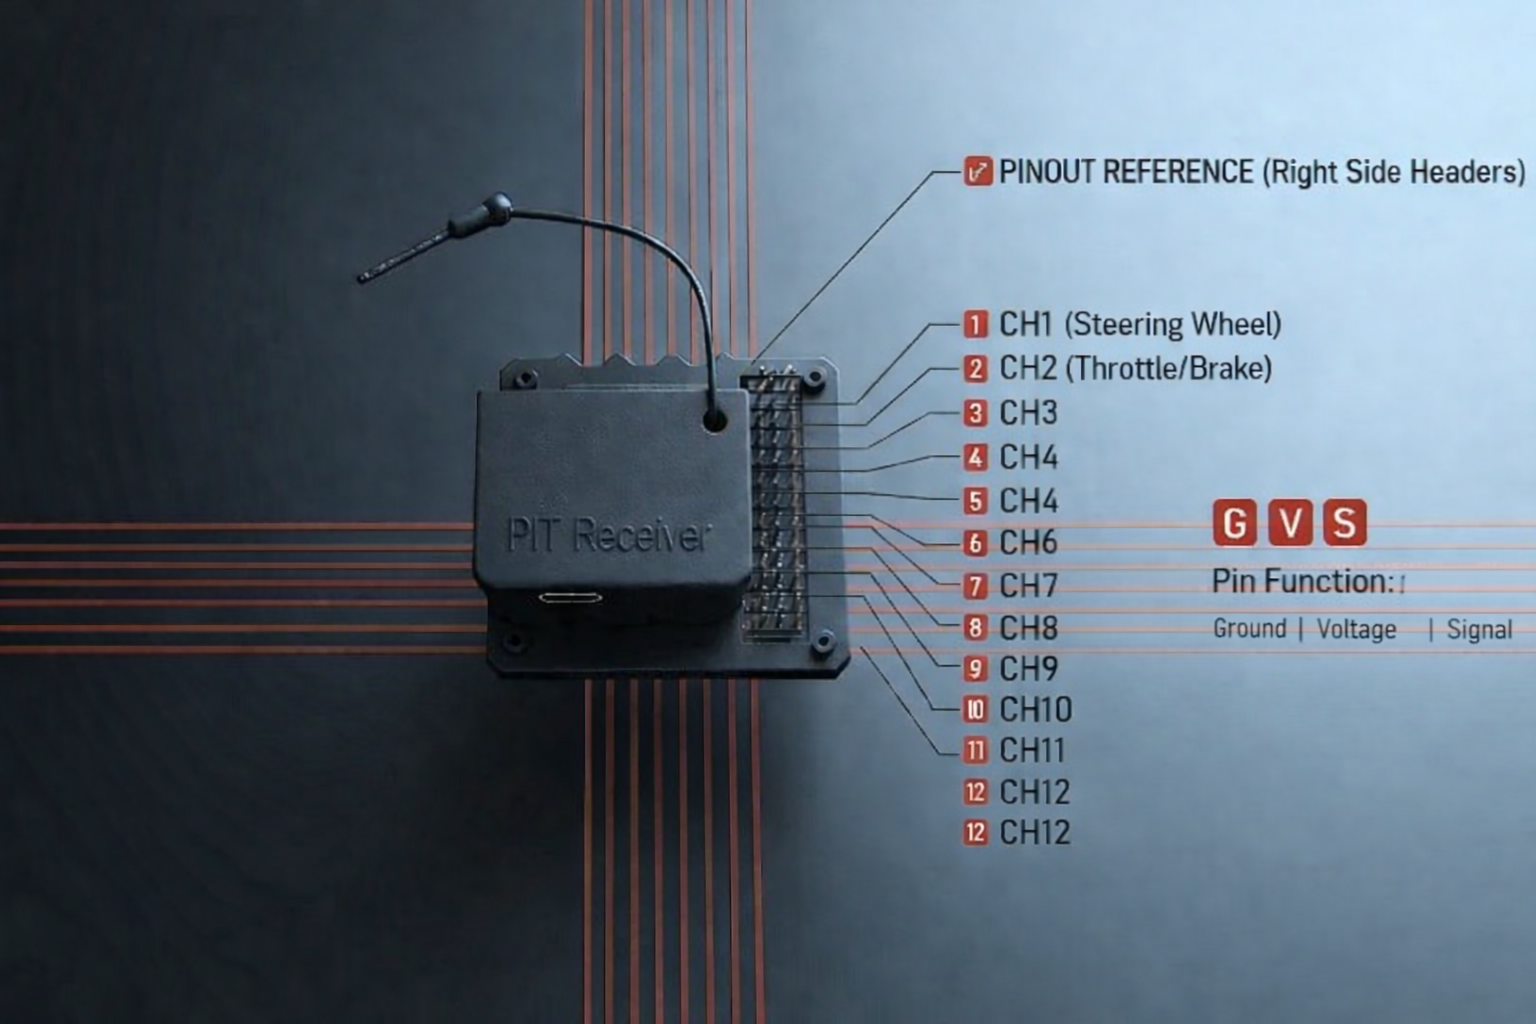
PIT Receiver — CH1 (top-left) through CH12 (bottom-right), each channel in GVS pin order.
Connect your wheel, then power on the transmitter and pair the app
- Download PIT SimBridge from the Apple App Store or Google Play Store.
- Before powering anything on, connect your steering wheel (and pedals, if separate) to the PIT Transmitter via USB.
- Now plug the PIT Transmitter into USB-C power (wall adapter, power bank, or PC port) so it boots up — leave it powered on for the rest of these steps.
- First time only: open the app → tap Setup Device → allow Bluetooth permissions → pick your transmitter from the scan list → choose your Wi-Fi network and enter the password → wait for the success screen. Your phone and the transmitter must stay on the same Wi-Fi. See Section 4.
Open the app, connect, verify inputs, and pick a profile
- The transmitter is already powered on from step 2. From the app's home screen, tap Connect to Device and select your transmitter.
- On the Dashboard, confirm the PIT Transmitter, Wheel Base, and Pedals show green dots. If anything is gray, tap Auto or Refresh.
- Check the Live Input panel: turn the wheel left/right and press the throttle and brake pedals. Confirm the steering, throttle, and brake values move in response. If they don't, fix the connection or remapping before continuing.
- Use the profile dropdown to pick the configuration for the car you're about to drive. See Section 5.
Press Start Transmission and confirm the transmitter lights
- Press the green Start Transmission button on the Dashboard (or the Transmission page).
- Wait until the transmitter shows steady green + blue on the front and steady blue on the back. If the back shows rainbow colors, the transmitter dropped into config mode — power-cycle it and start again. See Section 9.3.
Power on the receiver — only after the transmitter lights are good
- Now connect the RC vehicle's battery to power the receiver.
- Wait until both green and blue lights on the receiver are steady. If the green light blinks extremely fast, restart the receiver.
- You're driving. See Section 9.2.
Table of Contents
1. What's in the Box
| Item | Qty | Description |
|---|---|---|
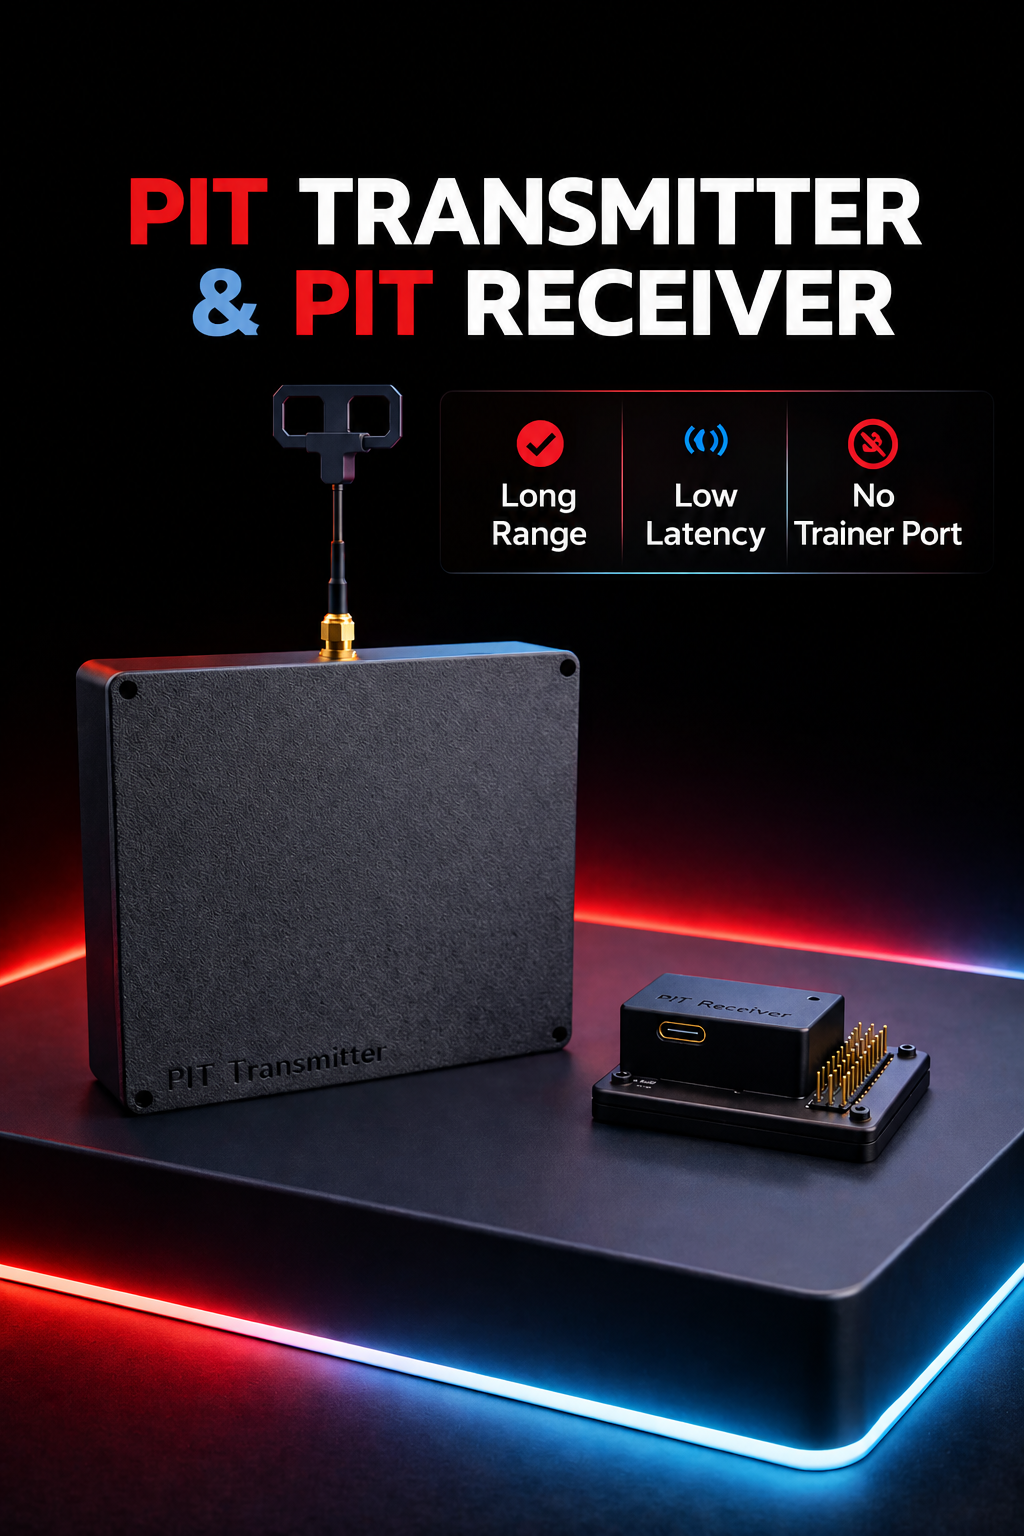
| PIT Transmitter | 1 | Main controller module — connects to your sim racing hardware via USB and transmits control signals wirelessly |
| PIT Receiver | 1 | RC module — mounts on your RC vehicle and receives control signals from the transmitter |
| Power Supply | 1 | Power supply for the PIT Transmitter |
2. Product Overview
PIT SimBridge lets you drive an RC car using your sim racing wheel, pedals, and shifter. The system consists of two devices — a Transmitter and a Receiver — that communicate wirelessly using the ELRS (ExpressLRS) protocol with built-in security.
2.1 PIT Transmitter
The PIT Transmitter is the brain of the system. It sits on your desk next to your PC and:
- Connects to your sim racing wheel, pedals, and shifter via USB (DirectInput/HID)
- Reads all your inputs (steering, throttle, brake, clutch, gear, buttons) in real time
- Transmits control data wirelessly to the PIT Receiver using ELRS
- Is managed through the PIT SimBridge app over Wi-Fi
- Supports Bluetooth for initial setup and Wi-Fi configuration
2.2 PIT Receiver
PIT Receiver — pinout reference showing all 12 channel outputs (GVS: Ground, Voltage, Signal)
The PIT Receiver sits inside your RC car and:
- Receives control signals from the PIT Transmitter over ELRS
- Outputs standard RC servo/ESC signals to your vehicle's steering servo, ESC, and accessories
- Supports up to 12 RC channels (CH1–CH12)
- Includes built-in security measures for safe operation
2.3 How It Works
| Connection | Technology | Purpose |
|---|---|---|
| Hardware → Transmitter | USB (DirectInput/HID) | Read wheel, pedal, and shifter inputs |
| App ↔ Transmitter | Wi-Fi (WebSocket) | Configure settings, monitor inputs, manage device |
| App → Transmitter (setup only) | Bluetooth (BLE) | First-time pairing and Wi-Fi configuration |
| Transmitter → Receiver | ELRS (2.4 GHz) | Real-time control signal transmission |
| Receiver → RC Vehicle | Standard RC PWM/CRSF | Drive servos, ESC, and accessories |
3. Wire Your RC Vehicle
Before powering anything on, connect the PIT Receiver to your RC vehicle's steering servo, ESC, and any accessories. Getting the wiring right at this stage prevents the most common (and most damaging) issues with the system.
3.1 Channel Outputs
The PIT Receiver has 12 channel outputs (CH1–CH12). Each channel uses three pins in GVS order: Ground, Voltage, Signal. Refer to the pinout diagram in Section 2.2.
| Channel | Connect | Notes |
|---|---|---|
| CH1 | Steering servo | Main steering output |
| CH2 | ESC signal wire | Throttle and brake — configurable in Drive Settings |
| CH3–CH12 | Accessories | Available for auxiliary use — map to wheel buttons via Button Mapping |
3.2 Servo Wire Orientation
Standard servo wires follow GVS color coding:
- Black or Brown = Ground (G)
- Red = Voltage (V), typically +5V
- Orange, White, or Yellow = Signal (S)
Match the connector orientation to the pin layout on the receiver. A reversed or off-by-one connection will not work and may damage components.
3.3 Powering the Receiver
The PIT Receiver is typically powered through your ESC's BEC (Battery Eliminator Circuit) via the voltage pin on the channel you've connected the ESC to.
- If your ESC has a built-in BEC, it will supply 5V or 6V to the receiver automatically.
- If your ESC doesn't include a BEC, use an external 5V regulator.
4. Getting Started
4.1 Install the App
Download the PIT SimBridge app from:
- Google Play Store — Search for "PIT SimBridge"
- Apple App Store — Search for "PIT SimBridge" (coming soon)
4.2 Connect Your Hardware
Before pairing, connect your sim racing equipment to the PIT Transmitter:
Power the PIT Transmitter
Plug the USB-C cable into the PIT Transmitter and connect it to your PC or a USB power source.
Connect your wheel base
Plug your sim racing wheel into a USB port on your PC. The PIT Transmitter will detect it automatically via DirectInput.
Connect your pedals
Plug your pedals into a USB port. If your pedals connect through the wheel base, they will be detected as part of the same device.
Connect your shifter (optional)
If you use an H-pattern or sequential shifter, plug it in via USB. Gear detection can be configured later in the app.
4.3 Pair via Bluetooth (First-Time Setup)
The first time you use your PIT Transmitter, you need to pair it with the app via Bluetooth to configure Wi-Fi. This only needs to be done once.
Open the PIT SimBridge app
After the welcome screen and disclaimer, you'll see the home screen with two options: Connect to Device and Setup Device.
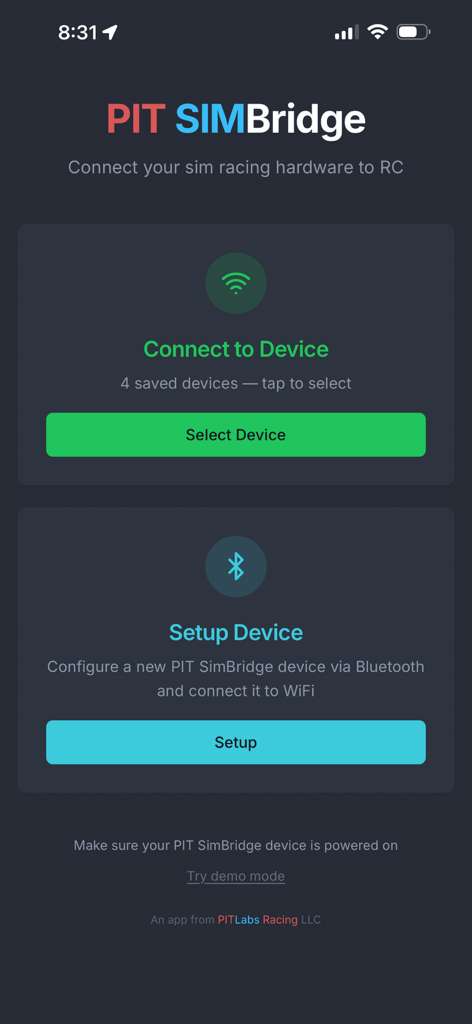
Home screen — Connect to Device or Setup Device
Tap "Setup Device"
This launches the Bluetooth setup wizard.
Allow Bluetooth permissions
When prompted, grant Bluetooth permissions. On Android, you may also need to allow Location access — this is required by Android for Bluetooth scanning but your location is never tracked.
Wait for your device to appear
The app will scan for nearby PIT devices. Make sure the PIT Transmitter is powered on. When your device appears in the list, tap it to select it.
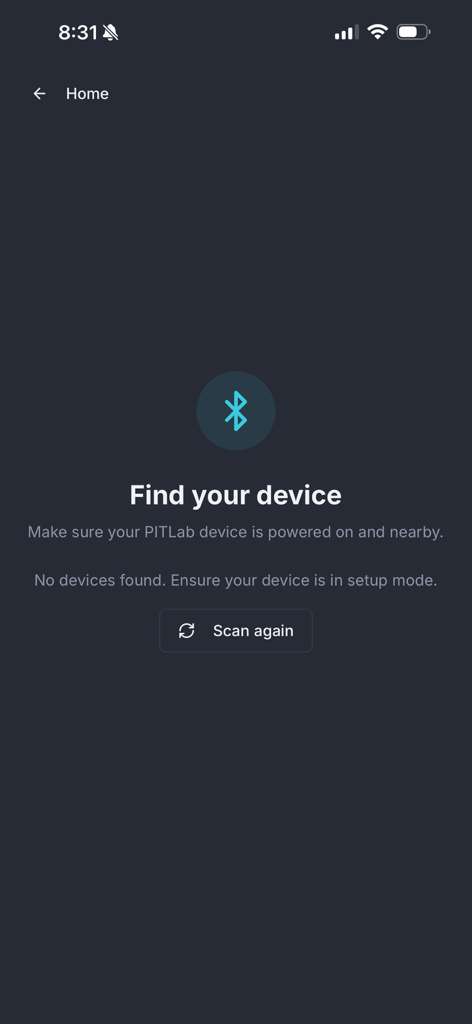
Bluetooth scan screen — searching for nearby PIT devices
4.4 Connect to Wi-Fi
After selecting your PIT Transmitter via Bluetooth, you'll configure its Wi-Fi connection:
Choose a Wi-Fi network
The app will show available networks. Select the same Wi-Fi network your phone is connected to. You can also use your phone's hotspot if no shared network is available.
Enter the Wi-Fi password
Type the password for your selected network. Use the eye icon to show/hide the password while typing.
Wait for connection
The app will send the credentials to the PIT Transmitter. You'll see progress updates:
- Connecting...
- Authenticating...
- Connecting to WiFi...
- Resolving local IP...
Setup complete!
Once connected, you'll see a success screen. Tap "Start using PIT SimBridge" to proceed to the dashboard.
4.5 Connect the App to Your Transmitter
After initial setup, the app will remember your PIT Transmitter. From the home screen:
- Tap "Connect to Device" to connect to a saved device
- If you have multiple devices, you'll see a list to choose from
- You can also edit or delete saved devices from this list
- For manual connection, use "Connect via Custom IP" and enter the IP address shown in the PIT SimBridge desktop app
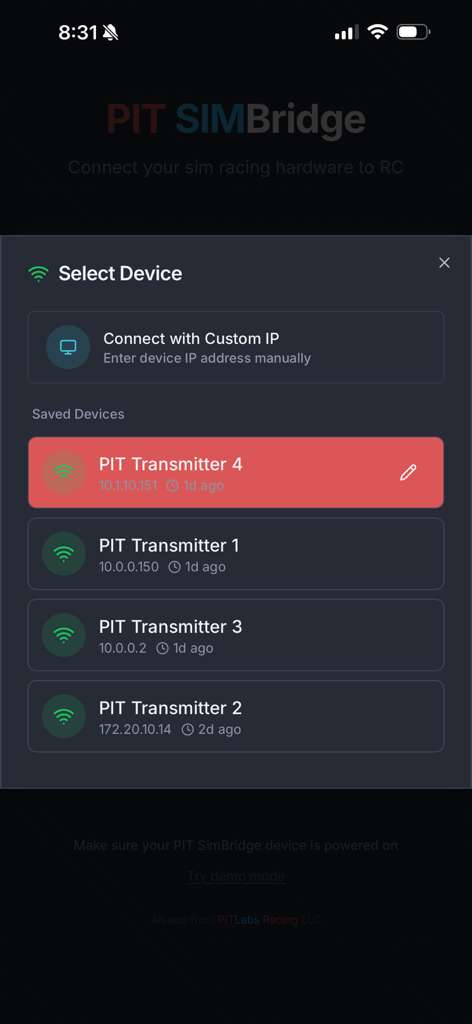
Device selection — choose from saved devices or connect via custom IP
5. Dashboard
The Dashboard is your main control center. It shows real-time input data from your sim racing hardware and lets you manage device connections and profiles.
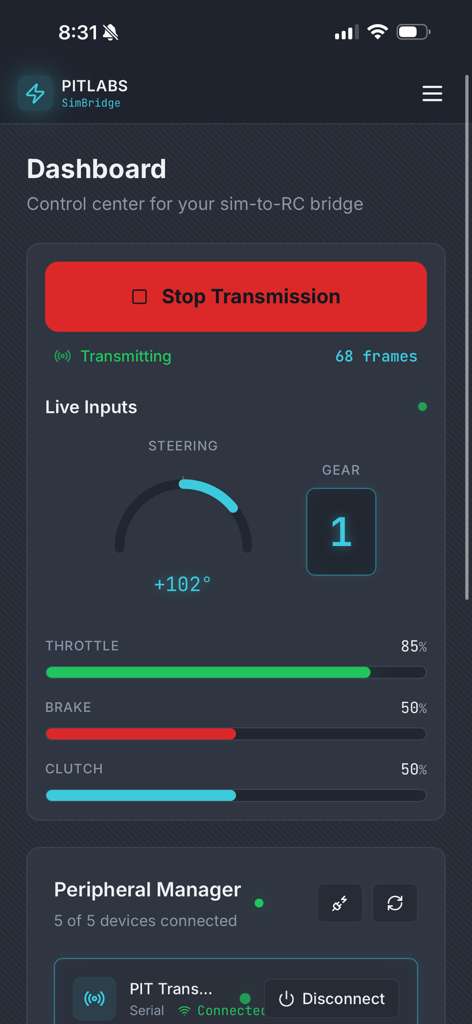
Dashboard — live inputs, transmission control, and peripheral manager
5.1 Input Monitor
The input monitor shows a live visualization of your hardware inputs:
| Input | Display | Range |
|---|---|---|
| Steering | Arc gauge | -90° (full left) to +90° (full right) |
| Throttle | Vertical bar (green) | 0–100% |
| Brake | Vertical bar (red) | 0–100% |
| Clutch | Vertical bar (cyan) | 0–100% |
| Gear | Large indicator | R, N, 1–7 |
A green "LIVE" indicator appears when data is flowing. The frame counter shows the total number of frames transmitted during the current session.
Transmission Control
The Start / Stop Transmission button is prominently displayed on the dashboard. Press it to begin sending control signals to your RC vehicle. It will only be enabled when the required devices (transmitter, wheel base, and pedals) are connected.
5.2 Device Connection Panel
The device panel shows the connection status of all five peripherals:
| Device | Connection Type | Required |
|---|---|---|
| PIT Transmitter | Serial (COM port) | Yes |
| PIT Receiver | Serial (COM port) | No |
| Wheel Base | DirectInput (USB/HID) | Yes |
| Pedals | DirectInput (USB/HID) | Yes |
| Shifter | DirectInput (USB/HID) | No |
Each device shows:
- Green dot = connected, gray dot = disconnected
- Device or port name when connected
- A dropdown to select which port or device to use
- Connect/Disconnect button
Quick Actions
- Auto — Automatically detect and connect all available devices
- Refresh — Rescan for available ports and devices
Transmitter Security
The PIT Transmitter shows a security status icon:
- Green shield = Authorized and secure
- Blue shield with "?" = Provisioning mode (first-time setup)
- Red shield = Unauthorized — re-pair your device
5.3 Profiles
Profiles let you save and switch between different configurations. Each profile stores your axis settings, button mappings, ESC configuration, and more.
- Switch profiles using the dropdown on the dashboard
- Create a new profile with the "New" button
- Import/Export profiles as JSON files for sharing or backup
- Rename, duplicate, or delete profiles from the dropdown menu
6. Axis Configuration
The Axis Configuration page lets you calibrate your inputs and map physical axes to the correct functions. Access it from the sidebar menu.
6.1 Calibration
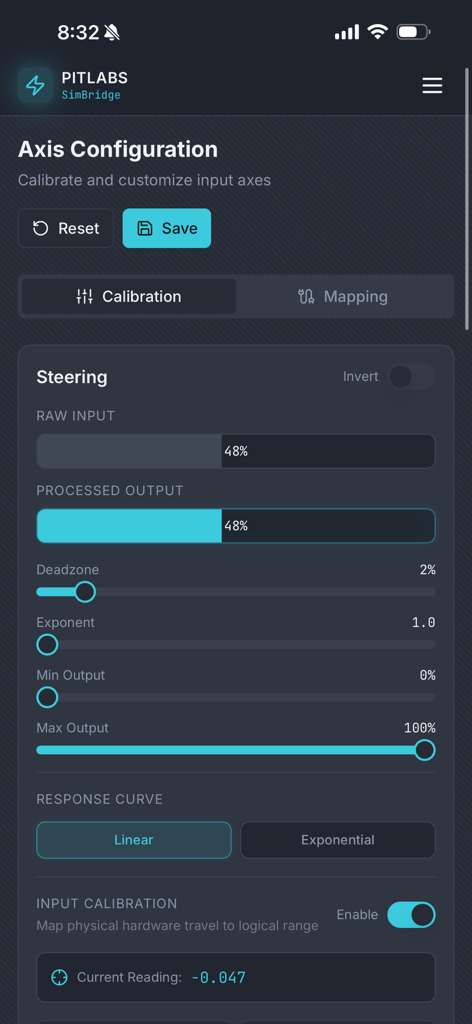
Axis Calibration — steering axis with deadzone, curve, and output settings
Each axis (Steering, Throttle, Brake, Clutch) has the following adjustable settings:
| Setting | Description | Range |
|---|---|---|
| Inverted | Flip the axis direction | On/Off |
| Deadzone | Ignore small movements near center | 0–50% |
| Min Output | Minimum output value | 0–100% |
| Max Output | Maximum output value | 0–100% |
| Curve | Response curve shape | Linear, Exponential, Logarithmic |
| Exponent | Curve intensity (for non-linear curves) | 1.0–4.0 |
• Linear — 1:1 input-to-output mapping. What you put in is what you get out.
• Exponential — Less sensitive near center, more sensitive at extremes. Good for precise steering.
• Logarithmic — More sensitive near center, less at extremes. Good for throttle control.
A live raw value indicator shows your current input in real time so you can see the effect of your changes immediately.
6.2 Device Mapping
If your wheel, pedals, or shifter axes don't line up correctly, use the Device Axis Mapping tab to assign the correct physical axis to each function.
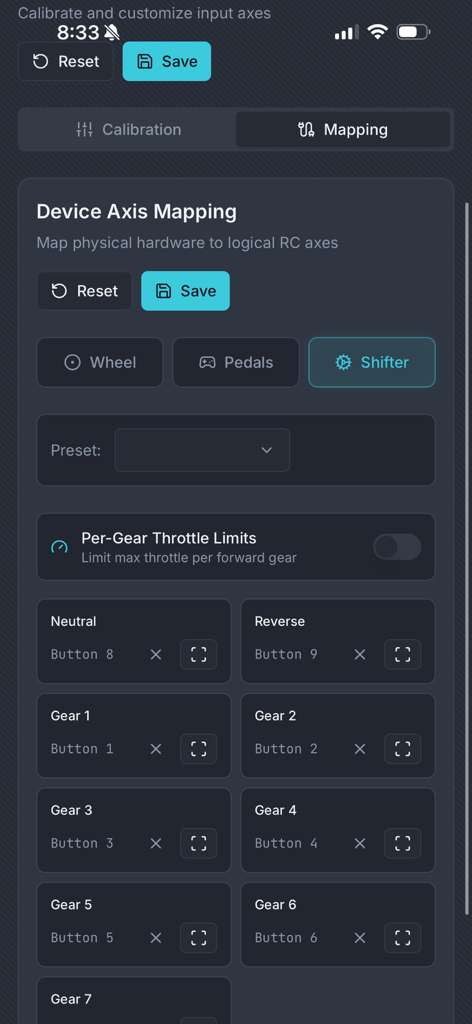
Device Mapping — shifter button assignments with per-gear detection
For each device (Wheelbase, Pedals), you can:
- Select a preset for common hardware
- Manually assign which raw axis index maps to steering, throttle, brake, and clutch
- Toggle Inverted per axis
Shifter Detection
For H-pattern shifters, use the Detect feature:
- Select a gear (Neutral, Reverse, 1st–7th)
- Tap "Detect"
- Move your shifter into that gear position
- The app will automatically detect and assign the button
6.3 Your Steering Wheel or Pedals Are Not Behaving Correctly?
If your steering, throttle, or brake feels wrong — reversed, swapped between pedals, or not picked up at all — head to 6.2 Device Mapping. From there you can:
- Invert the steering wheel direction (left turns right, right turns left)
- Invert the throttle or brake pedals if they're acting reversed
- Re-capture pedals or buttons if the app is picking up the wrong axis
- Manually reassign which physical axis is steering, throttle, brake, or clutch
- Pick a different hardware preset for your wheel base or pedal set
7. Drive Settings (ESC Output)
Drive Settings control how your inputs are translated into RC output signals. This is where you fine-tune the feel and behavior of your RC vehicle.
7.1 Steering Trim
The first thing you'll see in Drive Settings is Steering Trim. This lets you center the car's steering in real time — if your RC car is drifting slightly left or right when the wheel is centered, adjust the trim until the car drives straight.
- Nudge the trim left or right in small steps and watch the car's response.
- Changes apply live while transmission is running, so you can fine-tune as you drive.
- Trim is saved per profile, so each car remembers its own centering.
7.2 ESC Modes
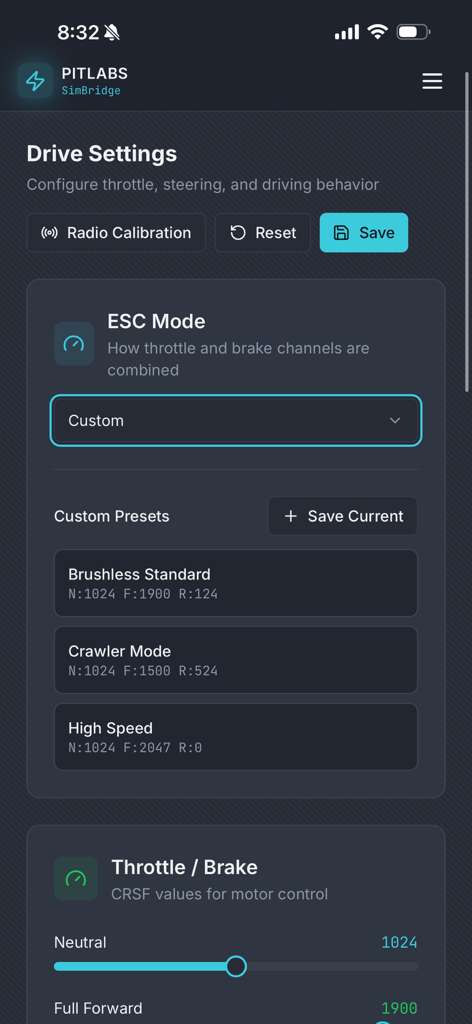
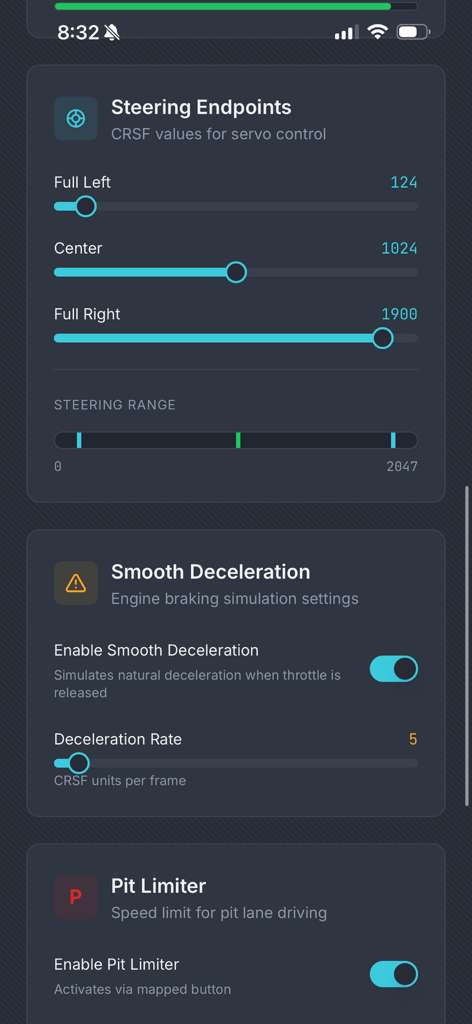
Drive Settings — ESC mode with custom presets (left) and steering endpoints with smooth deceleration (right)
Select the mode that matches your RC car's ESC (Electronic Speed Controller):
| Mode | Description |
|---|---|
| Separate | Throttle and brake on separate channels. Best for cars with independent braking. |
| Traxxas Combined | Preset for Traxxas ESCs. Throttle and brake combined on one channel. |
| Standard Combined | Generic combined mode for most hobby-grade ESCs. |
| Custom | Full manual control over all values. Supports saving and loading presets. |
7.3 Throttle & Brake
Configure the CRSF output values (0–2047) for throttle behavior:
- Neutral — The resting position (default: 992)
- Full Forward — Maximum forward throttle (default: 1811)
- Full Reverse — Maximum reverse/brake (default: 172)
A visual bar preview shows the relative positions of these values on the 0–2047 scale.
7.4 Steering Endpoints
Set the steering range to match your RC car's steering servo:
- Full Left — Maximum left steering output
- Center — Neutral steering position (default: 1024)
- Full Right — Maximum right steering output (default: 2047)
7.5 Smooth Deceleration
Simulates natural engine braking when you release the throttle, instead of abrupt coast-down.
- Enable/Disable toggle
- Deceleration Rate (1–100) — Lower values = slower, more gradual deceleration
7.6 Pit Limiter
Limits the maximum throttle output when activated. Useful for pit lane speed limits or practice sessions.
- Enable/Disable toggle
- Max CRSF Value (0–2047) — The maximum throttle output when the limiter is active
- Activated via a mapped button (configured in Button Mapping)
7.7 Reverse Mode
Controls how reverse driving works:
- Enable/Disable toggle
- Toggle Button — Select which button activates reverse, or use the shifter only
- Button Detection — Press "Detect" then press the desired button on your hardware
- Max Reverse Speed (0–100%) — Limits maximum reverse throttle
8. Button Mapping
Map buttons on your wheel, button box, or other hardware to RC output channels. This lets you control things like lights, horns, winches, or other accessories on your RC vehicle.
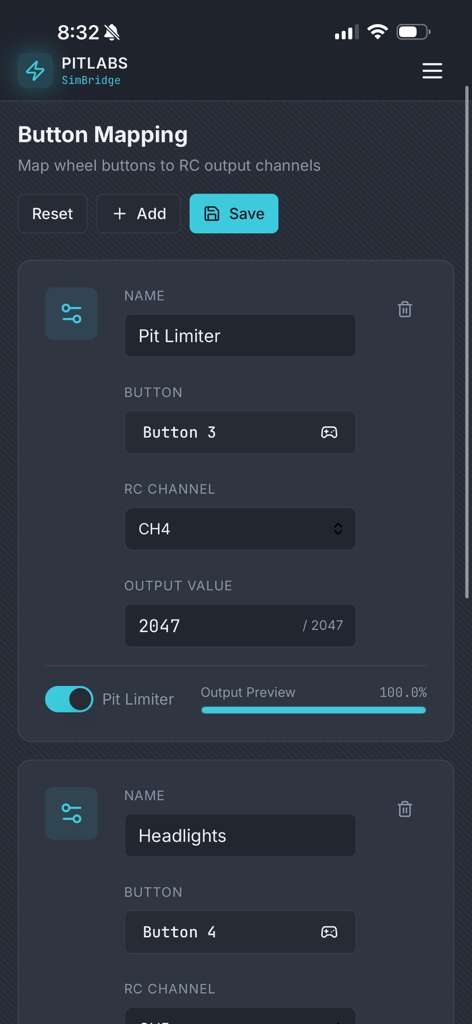
Button Mapping — map wheel buttons to RC channels with pit limiter toggle
Creating a Button Mapping
Tap the "+" button to add a new mapping
Name your mapping (e.g., "Headlights", "Horn", "DRS")
Capture a button — Tap the button field, then press the physical button on your wheel or controller. The app will detect it automatically.
Select the RC channel (CH4–CH12) the signal should be sent on
Set the output value (0–2047) that will be sent when the button is pressed
Optionally enable Pit Limiter — Toggle this on if the button should also activate the pit speed limiter
Don't forget to tap Save when you're done configuring your mappings.
9. Transmission Control
The Transmission page is where you start and stop sending control signals to your RC vehicle.
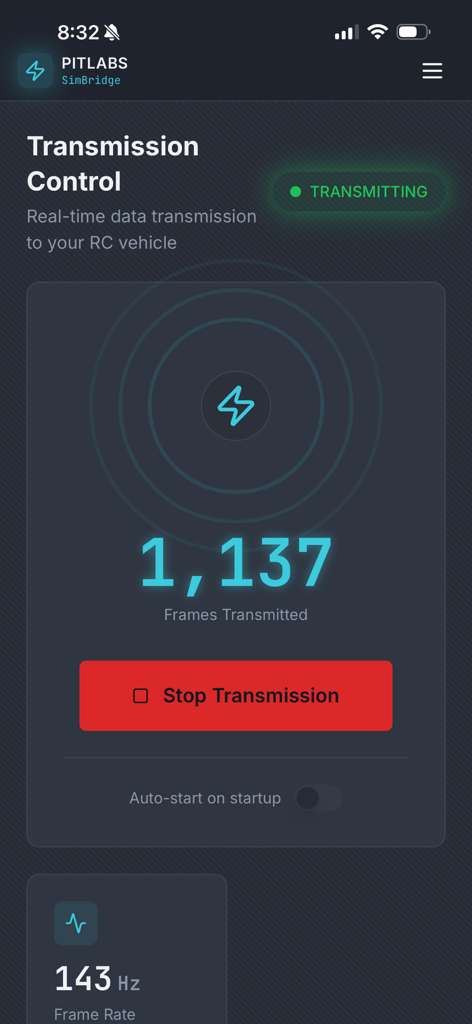
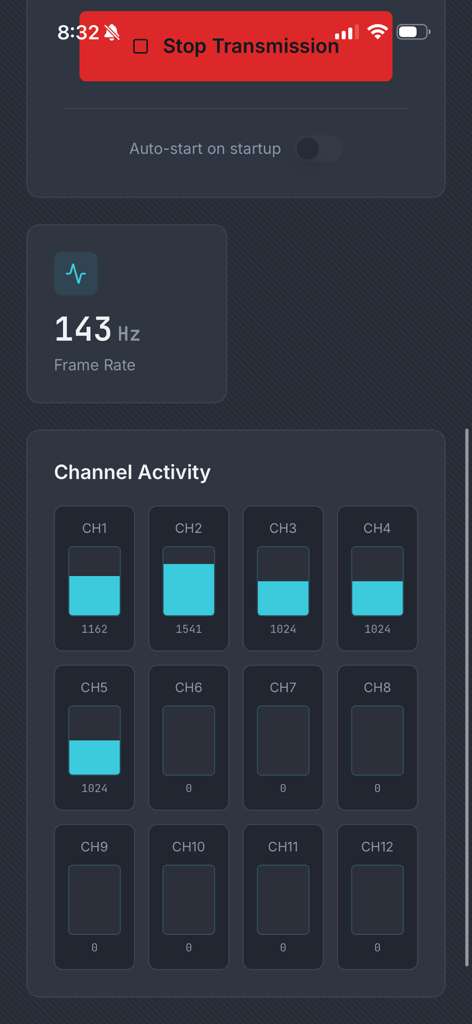
Transmission Control — frame counter (left) and channel activity grid (right)
Before You Start
Start Transmission Within 10 Minutes
After powering on the receiver and transmitter, you have approximately 10 minutes to start transmission. If transmission is not started within this time, the transmitter and receiver may enter configuration mode. If this happens, reset both devices before continuing.
Check Servo Wire Connections
Pay close attention to the servo wire connections before powering on the system. If you are unsure about the orientation, send a picture before turning the system on so it can be checked.
Check Transmission Status Indicators
Once transmission has started successfully, the receiver should show:
- A steady green light
- A steady blue light
The transmitter should show:
- A steady green light on the front
- A steady blue light on the front
- A steady blue light on the back
- If the back of the transmitter shows rainbow colors, the transmitter is in configuration mode — restart the transmitter before continuing.
- If the receiver green light blinks extremely fast, the receiver is also in configuration mode — restart the receiver by turning it off and back on.
Starting Transmission
- Make sure your PIT Transmitter, Wheel Base, and Pedals are connected (check the Dashboard)
- Navigate to the Transmission page from the sidebar
- Press the green Start Transmission button
- The status will change to "TRANSMITTING" with an animated indicator
What You'll See
- Radio wave animation — Visual confirmation that data is being transmitted
- Frame counter — Total frames sent in this session
- Frame rate — Current transmission frequency (typically ~143 Hz)
- Session timer — How long the current session has been running
- Channel grid — Real-time view of all 12 RC channels with current CRSF values
Auto-Start
Enable "Auto-start on startup" to begin transmission automatically when the app connects to your device. Useful when you want to power on and drive with minimal interaction.
10. Firmware Updates
Keep your PIT Transmitter and PIT Receiver up to date with the latest firmware for new features and bug fixes.
Checking for Updates
- Connect your PIT Transmitter to your Windows PC via USB
- Open the PIT SimBridge desktop app on your PC
- Navigate to Firmware from the sidebar
- Tap "Check for Updates" — the app will check both devices simultaneously
- If an update is available, the card will show "Update Available" with the new version number
Installing an Update
- Tap "Update to [version]" on the device card
- The progress bar will show the current stage:
- Downloading firmware...
- Entering update mode...
- Copying firmware...
- Waiting for reboot...
- Verifying version...
- Once complete, the status will show "Up to Date"
11. Troubleshooting
The app can't find my PIT Transmitter during Bluetooth setup
- Make sure the PIT Transmitter is powered on
- Move your phone closer to the device (within 10 meters)
- Check that Bluetooth is enabled on your phone
- On Android, make sure Location services are enabled (required for BLE scanning)
- Try tapping Rescan
- Restart the PIT Transmitter by unplugging and re-plugging the USB cable
The app can't connect after Bluetooth setup
- Make sure your phone and PIT Transmitter are on the same Wi-Fi network
- If using a phone hotspot, make sure the PIT Transmitter successfully connected to it
- Try using "Connect via Custom IP" with the IP address displayed on the PIT SimBridge desktop app
- Restart both the app and the PIT Transmitter
My wheel/pedals/shifter are not detected
- Make sure your hardware is connected via USB and recognized by your PC
- Press the Refresh button on the Device Connection Panel
- Try Auto-connect to automatically detect all devices
- Check that the correct device is selected in the dropdown for each peripheral
The steering/throttle/brake feels wrong or inverted
- Go to Axis Configuration and toggle the Inverted switch for the affected axis
- Check the Device Mapping tab to make sure axes are assigned correctly
- Adjust Deadzone if there's unwanted jitter near center
- Try a different Response Curve if the sensitivity doesn't feel right
My RC car doesn't respond to inputs
- Make sure Transmission is started (check the Transmission page)
- Verify that the PIT Transmitter, Wheel Base, and Pedals are all connected (green dots on Dashboard)
- Check that the PIT Receiver is powered on and properly connected to your RC car's ESC and servo
- Verify the ELRS binding between transmitter and receiver is active — the green LED on the receiver should be steady (not blinking). A blinking light means the receiver is not bound to the transmitter.
- Check Drive Settings to make sure throttle/steering values are configured correctly
The transmission starts but the car behaves erratically
- Perform a new ESC calibration with your steering wheel and pedals connected — go to Drive Settings and run the Radio Calibration wizard
- Check your ESC Mode matches your ESC type
- Reduce steering endpoints if the servo is binding or jittering
- Check for interference — move away from other 2.4 GHz devices
Firmware update fails
- Make sure the device stays powered and connected throughout the update
- Check your internet connection (the app needs to download the firmware)
- Try again — if it fails repeatedly, restart the device and the app
- Contact support if the device becomes unresponsive after a failed update
12. Safety & Compliance
Safety Warnings
- Always operate in a safe area — Use a designated RC track or open space, away from people, animals, and traffic
- Maintain line of sight — Always keep visual contact with your RC vehicle during operation
- Test before driving — After any configuration change, test controls at low speed before full operation
- Use a failsafe — Make sure your ESC has a proper failsafe configured in case of signal loss
- Battery safety — Follow your battery manufacturer's guidelines for charging, storage, and disposal
- Do not modify hardware — Opening or modifying the PIT Transmitter or Receiver voids the warranty
- Not a toy — RC vehicles can cause injury. Adult supervision is required for users under 14
Wireless Communication
The PIT Transmitter and Receiver communicate over the 2.4 GHz band using the ELRS (ExpressLRS) protocol with built-in encryption and security measures. All devices include hardware-level security protections.
Data Privacy
PIT SimBridge does not collect, store, or transmit any personal data. All configuration data is stored locally on your device. Bluetooth is used only for initial setup, and Wi-Fi is used only for local communication with the PIT Transmitter. See our full Privacy Policy.
Regulatory Compliance
The PIT Transmitter and PIT Receiver comply with applicable regulations for radio equipment. Please refer to the device labels for specific certifications for your region.
Warranty
PITLabs Racing LLC provides a limited warranty against manufacturing defects. For warranty claims, contact support@pitlabsracing.com.
The warranty does not cover damage from misuse, modification, water exposure, or normal wear and tear.
Contact & Support
| support@pitlabsracing.com | |
| Website | pitlabsracing.com |